???
Математика на уровне МГУ

Показано с 1 по 18 из 18

Тема: Переделки Cougar по советам забугорных товарищей

Древовидный режим

Предыдущее сообщение Предыдущее сообщение   Следующее сообщение Следующее сообщение
  1. #15
    Меценат
    Регистрация
    07.12.2006
    Возраст
    43
    Сообщений
    162
    Images
    7

    Ответ: Переделки Cougar по советам забугорных товарищей

    Скрытый текст:
    Step 4 - Inserting the washer and trimming the edge of the bottom plate

    In order to be able to apply greater tension needed to compensate for the lower friction in the system, I inserted a washer under the wheel which is raising and lowering the tension-lever arm.

    This may not be necessary, especially if you use some kind of powder to increase the friction. Ash, especially from a cigar or cigarette, should be suitable for this. However, I must emphasize, I've not tried this on the Cougar; but it works well on my violin (yes, it's true!) to prevent the pegs from slipping after soaping. (Soap and cigar ash have been used for at least a hundred years by musicians for this purpose, the thing is to find the right balance between the amounts of soap and ash: Too much soap, it slips. Too much ash, and you're back to where you started.) So if you rather want to try this approach as an alternative to increasing the amount of tension, please do. But it may take some experimenting until you're satisfied. And don't blame me if you have to spend quite some time doing this! (Nor for anything else!) Yet another - and perhaps even simpler - approach, may be to add some more alufoil or whatever firm material, between the pad and the tension-lever. I haven't tried this either, but it may work just as well. It's all up to you. Experiment, if you wish.

    If you want to follow my way, however, here's what you do:

    Find - or make - a washer, approx. 1-2 mm thick, that will fit under the small wheel that raises and lowers the tension lever arm. Be aware that this most likely will prevent the wheel from stopping at its maximum, and, in consequence, make the arm slip down, and you will have to start turning the wheel again. This can be remedied by obvious extra fittings, but is not strictly necessary, so I will not go further into this matter here. When you see the parts, you'll probably understand what I mean, and what it takes.


    Now, lift the wheel off, place the washer under the wheel and replace the wheel. Replace the lever (with the wrapped rubber pad in place) and go for the metal-file.

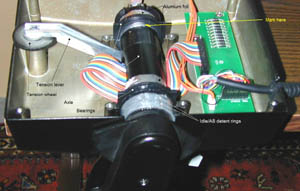
    Using the file, remove a part of the metal in the bottom plate which is (normally) directly adjacent to the wheel. This area should now be marked (in step 1), so it should be easy to remove only the metal conflicting with the wheel in its new position (see illustration below). How deep you have to cut depends on the thickness of the washer. Do not use a washer that is too thick, as this will probably create to much tension in the system later on. 1-2 mm should suffice.


    This done, we move on to the next, and perhaps most tricky, part of the operation:

    Step 5 - Inserting the aluminum foil

    As you might have realized by now, the stickiness of the throttle is not only caused by the rubber-pad against the greased axle, but also - to a great extent, actually - by the bearings. Therefore we have to make certain that the axle will move smoothly inside these as well. This is done by inserting two pieces of alufoil here, one piece inside each bearing (yes, I know some of you know; bear with me, please).

    Start by cutting two even, clean, pieces of the aluminum foil with the scissors. The pieces should each be quite a bit broader than the bearings, and - ideally - as long as the full circumference of the axle (or - more practical - just a very little bit shorter). You might have to try a few times to accomplish this perfectly. Also, this must be done before you put the axle back into its beddings. When the foil is well in place under each bearing, apply a small amount of glue between the bearing and the foil in order to make sure that the axle will rotate within the foil, and that the foil will stay in place relative to the bearing.


    Step 6 - Wrapping up - and some bonuses

    OK, having come this far, the worst part now lies behind us. With the alufoil successfully inserted and glued to the bearings, replace the end plate of the axle (slide it into place), replace the little screw that holds it in place, and insert the potentiometer into the end plate. Carefully replace the axle into its beddings and make certain that both bearings, and the end plate and the pot-meter enters their respective beddings. Also, make sure that the tension-lever and the pad is still properly in place and that the wheel is turned all the way down, i.e. to the smallest possible tension.

    Now, get the toothpick, sharpen it with the knife, and insert it as far as it will go with firm, but careful force, into the small space between the pot and the wall of the bedding, as shown in the illustration below:


    As you most certainly will have guessed, the insertion of the wedge is done to eliminate any play of the pot in its bedding, so when you pull the throttle back after it has been pushed forward (or vice versa), there will be no delay before the pot starts turning. Although this has nothing to do with the friction, it makes the operation of the TQS even more accurate (which is exactly what we're after here, isn't it?).

    Having done that, you might as well degrease the detent rings and the detent plate in the bottom casing, and put some plastic tape on them as well. This will dampen the hideous "clicks" which has kept many a wife, or girlfriend, or mother, or whatnot, awake during long hours of nocturnal flightsimming with the Cougar.

    For covering the detent rings/plate, I used two layers of tape. The more layers you apply, the softer the clicks, and vice versa. You can also remove the clicks altogether by removing the plate from the bottom casing (fastened with a pair of screws and some springs). Take good care of it if you do remove it; you may want to put it back later. For maintaining total control of the throttle movement, you should remove the plate. The price you pay for this, however, is that you lose the idle/AB detent clicks. I chose to keep them, but in a much softer form, as explained above.
    The choice is yours.

    Step 7 - Final reassembly and testing

    Done! - almost. If everything has gone well, the remaining part of the operation should be relatively simple: Replace the bottom cover carefully, making sure that it enters perfectly. Insert the four long screws in the middle, and the four short ones in the corners, and tighten evenly and firmly, but not too hard; especially the four ones in the middle. Remove the TQS from the table, and the bluetack, and test the operation of the throttle handle. Adjust the tension if necessary. Hopefully, you will now have achieved a most satisfactory result. If not, back you go, into the box! But you should know your way quite well by now, so I'll stop this part right here.

    Do not you give in until you're absolutely satisfied, though. It should be possible to get a totally smooth operation of the throttle based on the principles I've just outlined. And don't forget the soap!
    Good luck! (and don't forget to drink the beer, either!)

    A few words on the final

    This paper was written as an effort to help other Cougar owners overcome this irksome problem with the Cougar TQS, and is based partly on my own experiences, as well as other people's. Some of the information I needed before I started was collected from different threads in the Cougar World forums, and I should credit the ones who have fiddled with this problem before me, and who have shared their knowledge for me to benefit from, but they are too numerous, I would be sure to forget someone. So, thanks, all of you!

    Now, plug in your Cougar and enjoy!


    ШАГ 4. Установка шайбы и обрезка кромки нижней крышки.

    Для того чтоб можно было усилить жесткость, нужно компенсировать низкий коэффициент трения, для чего я вставил шайбу под колесико регулировки жесткости. (Не очень корректный перевод, но по-русски я бы так не сказал)

    Собственно говоря это не обязательно, особенно если вы используете какой нибудь порошок для увеличения трения. Пепел, в частности сигарный или сигаретный, подходит для этих целей. Тем не менее я должен подчеркнуть, что я не пытался использовать пепел в Кугаре, но это работает хорошо на моей скрипке (это правда), предотвращая соскальзывание колков после намыливания (Мыло и сигарный пепел используются последние столетия музыкантами для этих целей, вся штука в том, чтоб найти правильный баланс между количеством мыла и пепла: Слишком много мыла - скользко (Вообщем я совершенно не могу понять как может мыло применяться к колкам, вразумите кто нибудь неразумного). Слишком много пепла и вы вернетесь к тому, с чего начали.). Так что если вы пожелаете попробовать этот способ как альтернативный, для увеличения трения, пожалуйста делайте. Но это может потребовать несколько попыток, прежде чем у вас получится. И не упрекайте меня, если вам понадобится потратить много времени на это. Еще один и возможно самый простой способ — это добавить больше фольги или материала другой фирмы, между крышкой и рычагом напряжения. Я не использовал ни один из этих способов, но это должно сработать. Все зависит от вас. Экспериментируйте как пожелаете.

    Если вы ходите последовать моим путем, вот что нужно сделать:

    Найдите или сделайте шайбу, приблизительно 1-2 мм толщиной, которое подкладывается под маленькое колесико, которое регулирует жесткость хода ручки газа. Учтите, что скорее всего это будет мешать колесику останавливаться на своем максимуме и оно будет соскакивать вниз, вам нужно будет начинать крутить колесико сначала. Это может быть исправлено подгонкой, но это не столько необходимо, так что я не шел дальше в этом направлении. Когда вы видите детали, вы вероятно понимаете что я имею в виду и для чего это нужно.

    Теперь снимите колесико, подложите шайбу под него и поместите колесико назад. Replace the lever (with the wrapped rubber pad in place) (слова понятны, в кучу собрать не могу, не улавливаю сути. Возможно — просто убрать рычаг жесткости), и возьмите напильник.

    Напильником удалите часть метала на нижней крышке, которая в непосредственной близости к колесику. Эта область должна была быть маркирована (в шаге 1), так что должно быть легко удалить только тот метал, который соприкасается с колесиком в его новом положении. Не используйте слишком толстую шайбу, т.к. Это возможно создает позже слишком большое давление в системе. 1-2 мм должно быть достаточно.

    Все сделано, теперь двигаемся к следующему и возможно самому сложному этапу.

    ШАГ 5. Вставка алюминиевой фольги.
    Как вы могли уже понять, липкость (не могу пока подобрать точнее слова) РУДа зависит не только от трения между рычагом жесткости и смазанной оси, но так же в большой степени и от держателей. По-этому мы должны удостоверится что ось перемещается гладко внутри них. Этого можно добиться вставив туда два кусочка алюминиевой фольги, по одному внутрь каждого держателя.

    Начнем с отрезания двух гладких, чистых куска фольги ножницами. Кусочки должны быть каждый шаре чем держатели и , в идеале, длинной как полная окружность оси (или — более практично — чуть чуть короче). Возможно вам придется попробовать несколько раз, чтоб это получилось прекрасно. Так же, это должно быть сделано перед тем, как вставить ось обратно в основание. Когда фольга находится под каждым держателем, капните немного клея между держателем и фольгой (!!!) (вот тут я в тупике) и убедитесь что ось вращается без фольги и фольга остается на месте относительно держателя.

    Шаг 6. Собираем все в кучу и немного дополнений.

    Итак, сложная часть уже позади. Фольга успешно вставлена и приклеена к держателям (подшипникам), собираем конец оси (напомню что там хрень какая то вначале снималась, вообщем ставим ее на место), закручиваем маленький болтик, который ее держал, и вставляем резистор в свой паз. Аккуратно помещаем ось в держатели и убеждаемся что оба держателя и конец оси с резистором входят в свои пазы. Так же убеждаемся что рычаг жесткости и прокладка находятся на своих местах и колесико крутится по всему диапазону вверх и вниз, перемещаем его в точку минимальной жесткости.

    Теперь берем зубочистку, и вставляем между зазором резистора и паза, в который тот вставляется. … Как вы уже догадались зубочистка удаляет люфт....

    После всего этого вы должны как следует обезжирить боковые кольца, наклеив на них скотч, чтоб не было слышно «кликов» (вообщем то много лишних слов товарищ пишет. Проще кольца вообще ослабить и убрать ниже те части, от которых происходит щелчек).

    Для покрытия скотчем колец я использую два слоя. Большее количество слоев дает тише «клики»... (потом речь идет как раз о том что кольца можно убрать вниз, потом о том что их можно снять и зачем-то хранить...).

    ШАГ 7. Финальная сборка и тестирование.

    Если все прошло хорошо — собрать все в кучу должно быть легко. Вставляем на свои места болты длинные и короткие... (вообщем дальше идут очевидные вещи и рассказ про то, как все должно быть хорошо, потом автор раскланивается и говорит спасибо, а мы ему ).

    ---------- Добавлено в 14:07 ---------- Предыдущее сообщение было написано в 14:03 ----------

    Вообще конечно меня во всей этой истории смущает "суперклей". Особенно момент когда нужно фольгу крепить суперклеем не к оси, как я подумал сначала, а к подшипнику. Более того, если что то не верно сделать, то ведь суперклей хрен потом отклеишь да и не совсем понятно как можно приклеить эту фольгу вокруг - с помощью капли клея, а потом будет трудно если что очищать от всего этого безобразия внутренности. Опять же вопрос - нужно ли смазывать место соприкосновения фольги по краям и оси или они должны на сухую тереться. У кого какие мысли ?

    Оффтопик:
    Кстати, у меня уже дважды шлейф, идущий к кнопкам просто отсоединялся в процессе полетов от платы. Вот думаю чем скрепить, но не суперклеем
    Крайний раз редактировалось Zalex; 10.06.2010 в 16:14.

Ваши права

  • Вы не можете создавать новые темы
  • Вы не можете отвечать в темах
  • Вы не можете прикреплять вложения
  • Вы не можете редактировать свои сообщения
  •