There are several ways, actually. Some easy, but perhaps not-so-efficient-ways, some harder and more efficient. And a few hard and inefficient as well, though.
The easiest solution is just to slacken - or even remove - the four long screws in the middle of the bottom plate of the TQS. This helps. Some people are quite happy with that. So try that first! If you are satisfied with this, then all is well; if not, please read on.
It's all about friction
Friction as such can be divided into two different types: Static and moving. All materials and surfaces have their own particular friction-characteristics, and the important part, in our case, is the difference between the static and the moving-friction for each set of material - or materials - in contact with each other. For some sets of materials this difference is big; for others, smaller. A waxed ski on cold snow, for instance, makes up a great static-friction force, but a very little moving-friction force. In other words, it takes a lot to make the ski glide from a standstill, but as soon as it glides, it glides; and very easily, too. (Which is just why cross country skiing is possible - unless you're skating on your skis, of course!).
Now, here exactly lies our problem: The choice of materials and type of grease used in the Cougar TQS is most unfortunate in this respect; the materials have a huge difference between static and moving friction, and the grease which is applied during manufacture (as a futile effort to reduce this problem?), is not sufficient by far; and the result is - as we all know - disastrous. In fact, this is perhaps THE most annoying physical issue concerning the Cougar (perhaps let alone the center-play and stiffness of the joystick itself).
So what we really need to do, is to change the materials rubbing against each other inside the TQS. At least, that's what I did, and my throttle is now as smooth as silk - and still very firm, so that I'm able to rest my hand on the handle without fear of moving it. It's absolutely perfect!
But how?
Now, before you read any further, just be aware that if you make any attempt to follow this guide, neither the writer nor the publisher of this document will be responsible for what might happen to your TQS if you do. So, if you screw up your own - or perhaps someone else's - Cougar TQS, it's solely your own responsibility, and you do this totally at your own risk. Be warned!
That said, unless you're rather clumsy and/or reckless, there's a rather fair chance that you'll succeed in undertaking this operation. Let's get down to business.
Firstly, exactly what supplies are needed for the job? Here is a list of what I used:
A small pair of scissors
a screwdriver
alcohol (as degreaser, mind you)
some aluminum foil (the multi-layer type with plastic between the layers is superb; Toppits/Melitta/Cofresco or similar)
a small knife
a toothpick
a file (for metal, about 15 mm wide)
some glossy, transparent, plastic tape
a small washer (1-2 mm thick, 10-12 mm wide, hole 4-6 mm), almost any material will do
a rag (cloth)
some "bluetack"
some glue, preferably quick-drying (superglue is fine)
some thick, liquid soap
some cigar or cigarette ash (not absolutely necessary)
good, sufficient, light
a couple of hours
a cool beer or two (but not much more!)
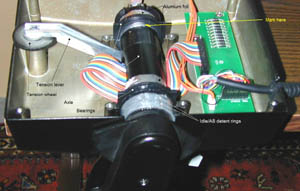
And here is - in short - what I did: I opened the TQS, marked the axle, removed the pot-meter from the axle, removed one of the bearings from the axle (some disassembly needed), degreased the axle and bearing, put the bearing back on the axle, applied glossy plastic tape to the axle, inserted aluminum foil between the axle and bearings, applied a drop of glue between the foil and the bearings, dressed the tension-lever rubber pad in aluminum foil, lubricated tape and pad with soap, inserted a washer under the wheel that adjusts the tension, removed some of the metal in the casing (because of the new - now lower - position of the wheel), and put it all back together again. I had to experiment quite a bit before I got this far, really, but that was some of the fun as well.
Now, half of you have now probably got a pretty fair idea of what I'm driving at; the rest of you may not even have a clue. But don't worry! We'll take this step-by-step:


)

 Ответить с цитированием